How to Use LinkedIn Sales Navigator Like a Pro
As the biggest professional social networking site, LinkedIn is the perfect place for B2B marketing. However, bear in mind, it’s also one of the most expensive paid advertising methods available. That said, the quality of leads is a lot better than Facebook, Twitter or Instagram, so it’s worth considering.
In addition to Ads and Sponsored Content, LinkedIn offers 4 premium options: Career, Business, Sales Navigator & Recruiter Lite. They vary based on options for advanced search, lead recommendations, LinkedIn learning, InMail credits and more. You can take a look at all the differences here.
In this article, let’s take a look at how to use LinkedIn Sales Navigator like a pro to increase your leads. This is a popular option for companies with smaller budgets, as Cost per Conversion on LinkedIn otherwise is very high.
Key Features of LinkedIn Sales Navigator
I love Sales Navigator. It’s my go-to premium option when I need to quickly get in contact with super specific people. For example, a startup’s HR manager to invite employees to a workshop or an illustrator at a specific publishing house to get feedback on Mediamodifier’s tools.
The main features are:
- Advanced search
- Standalone sales interface
- Lead recommendations
- 20 InMail credits
- The opportunity to message people whose profiles are only open to premium accounts
Let’s take a look at what all of that means, but first …
Make sure your LinkedIn profile is professional
Unlike when setting up ads, you’ll be contacting your leads personally by messaging them. More often than not, your leads will look at your profile before deciding whether they want to reply to you.
If your profile looks like it was just made, has no information and no connection to what you’re contacting them about, there’s a good chance they won’t take you seriously. So, before starting your premium subscription, you should spend some time on your LinkedIn profile.
If you need any tips, we recently wrote an article about how to create the perfect profile. Check it out!
Using Advanced Search
Sales Navigator and Recruiter Lite both offer advanced searches, but they’re a little bit different. Simply, Recruiter Lite is better for process management and Sales Navigator is for relationship building.
The specificity of the search options are honestly kind of scary. Say for whatever reason you want to find a graphic designer for a managerial position at Penguin Random House UK who have worked in the company for at least 2 years. No problem! Just set up the search.
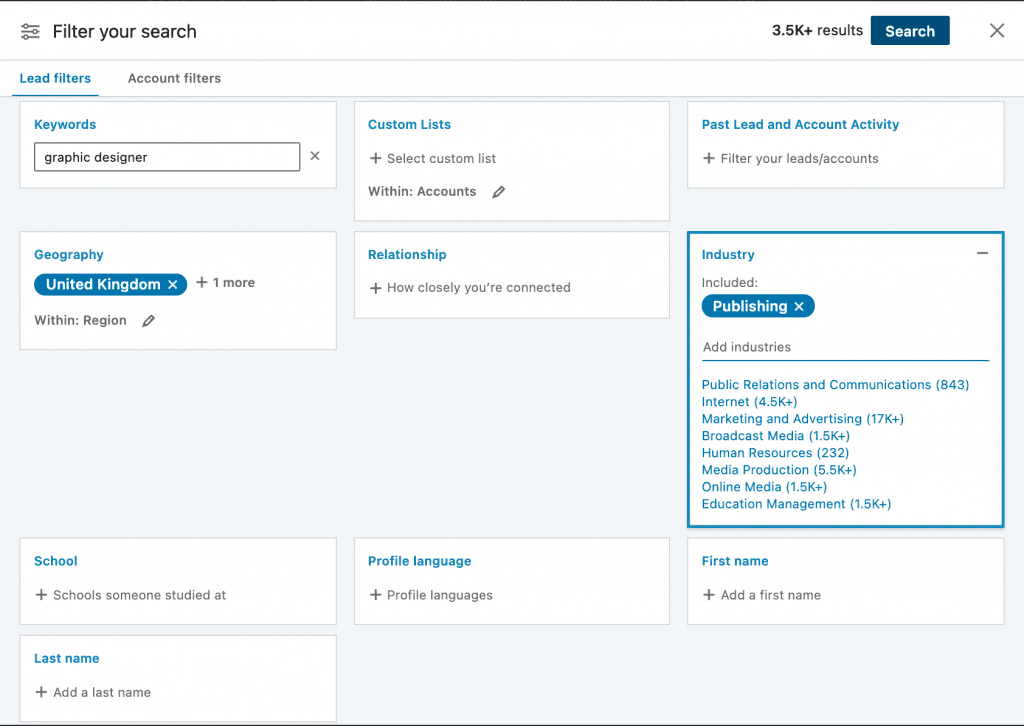
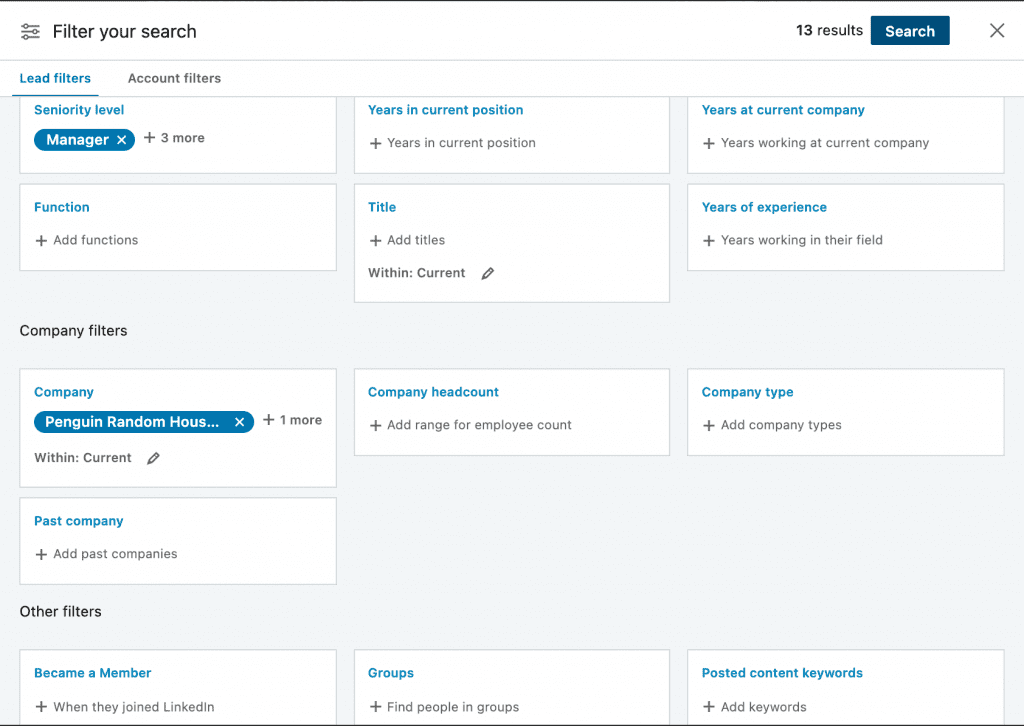
And voila! We have 13 prospective leads. 2 of whom have changed jobs in the past 90 days.
Personal information blacked out for privacy.
The search options:
Although most search filters are relatively self-explanatory, let’s take a look at a handful of the most important ones. All of the following can also be applied to find Accounts aka companies who match your needs.
Keyword
This looks for words or phrases that have to be present in the person’s profile for them to appear. You can use job titles, skills or particular terms. Just like when searching on Google, you can put your keywords in quotation marks for exact matches or use the modifiers AND, NOT and OR for more specific results. See more detailed instructions here.
Geography
Target people in specific regions. This is especially great for huge international corporations, when otherwise it might be difficult to find your region’s representative. Also perfect for recruitment!
Relationship
This filter allows you to find people who you have mutual connections with. You can then ask for an intro from one of them. Always better than a cold call!
First or Last Name
Ever been to a networking party where you know they’re working in an industry you’re interested in and you heard their name is Martin something, but can’t find them? This is where these filters come in handy. Also works if you know exactly who you’re after and don’t need anything else.
Seniority Level
Need to get in touch with a manager of CXO? Or the opposite, someone lower down the ladder who is more accessible? Specify here.
Company
This one’s pretty self-explanatory and super useful. So is the company headcount.
Create a list of valuable leads
It’s handy to create a list of potential leads before contacting them straight away. You only have 20 message (InMail) credits, so it’s best to use them once you’ve compiled all the info, keep track of who is next in line to be messaged and build sales pipelines.
Click on Save in the top right corner of the profile.
Bonus function: You can find similar profiles who don’t match your search exactly, but whom LinkedIn thinks would be of use to you.
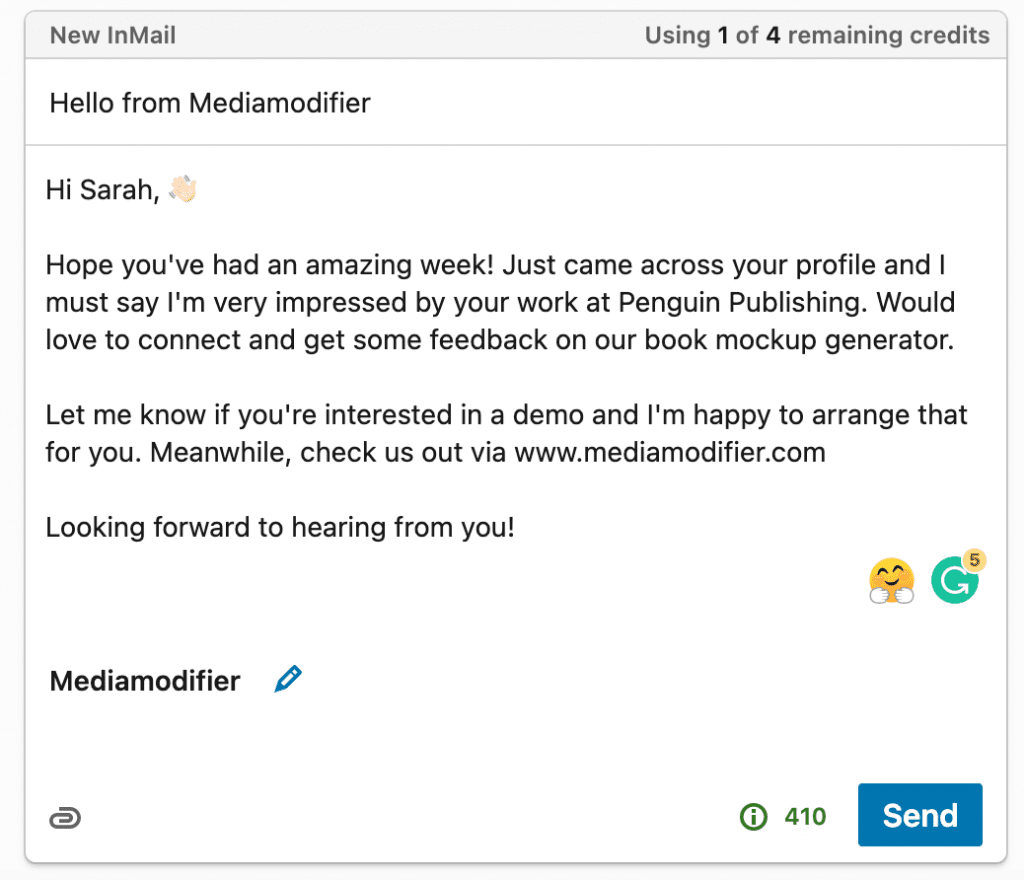
Finally, reach out to your leads
Now that you’ve found your leads and systemized them in lists, it’s time to finally reach out!
The message length limit is 1900 characters, however, they recommend keeping it less than 500 characters as it is more likely to get a response. And getting a response is important! You only get 20 credits, which means you can send 20 messages. However, once someone replies, you get your credit back.
Some best practices to get people to reply:
- Keep it short and sweet
- Open with a compliment (ie I’m really impressed by what you’re doing at *current position*
- Open with a question. One that entices people to answer.
- Make your offer one they cannot refuse. They just have to find out more
Finally, if relevant, add an attachment. LinkedIn supports .pdf, .txt, .doc(x), .xls(x) and .rtf files as attachment. This means you can’t add a picture of your smiling face, but a professionally designed one-pager works wonders.
You can use our tools to help you design one.
That’s all you need to know about how to use LinkedIn Sales Navigator. Happy lead hunting!
Frequently Asked Questions on how to use LinkedIn Sales Navigator
What is LinkedIn Sales Navigator?
LinkedIn Sales Navigator is a premium B2B sales tool designed for professionals and teams to identify, research, and connect with decision-makers. It offers powerful advanced search options, lead and account recommendations, and messaging capabilities—even to users you’re not connected with through InMail.
What are the key benefits of using LinkedIn Sales Navigator?
- Advanced Search Filters: Narrow down leads by industry, company size, role, and more to target the right people efficiently.
- Lead & Account Recommendations: Receive suggestions based on saved lists and browsing behavior.
- InMail Messaging: Enables you to message prospects even when not directly connected (with credit limits per month).
- Standalone Sales Interface: A dedicated dashboard focused entirely on sales outreach.
How should I prepare my LinkedIn profile before using Sales Navigator?
Your outreach success often depends on your profile’s professionalism. A polished profile with detailed experience, a strong headline, and a quality photo builds credibility and increases response rates, especially when contacting prospects for the first time.
How do advanced searches work in Sales Navigator?
You can create hyper‑targeted searches using filters such as keyword matches, geography, relationship degree, seniority, company, and tenure. For example, you could locate graphic design managers at specific publishers with at least two years of experience—high precision, fewer wasted leads.
How should I manage lead lists and messaging credits?
Save potential leads into lists before messaging. You get a limited number of InMail credits per month (typically 20), but credits are refunded when someone replies. Organizing leads in lists helps you strategize outreach and track responses efficiently.
What are some best practices for reaching out via InMail?
- Keep messages concise—ideally under 500 characters.
- Start with a sincere compliment or relevant reference.
- Pose an engaging question rather than making a hard-sell pitch.
- Attach one‑page documents like PDF one‑pagers when relevant to add context and professionalism.
Related articles
Visualize your design Use a product mockup to showcase your design


Create your design Use our templates to create delightful designs for any medium


